


Products Category

Trustpilot Reviews

- RSbee offers various kinds of RS services, including rs 07 quest, account, items, skill power leveling, and so on, along with 24 hours online support. We sincerely thank everyone for your support and trust. We strive to keep improving our site and service to repay all of our customers.
- Why Choose RSBee? Customers' needs and satisfaction first! - It's our unshakable mantra. Wherever you are, and whatever you need, RSBee will fulfill all your requirements and expectations.
- 1. No Personal Information Asked Don't worry about the security of your personal information on our site. RSBee will never ask for your personal information.
- 2. Low Price Guarantee RSBee strives to provide RS 2007 services for players, and we firmly believe that you can get the best service and the low price (osrs gold) on our site.
- 3. The Easiest Buying Guarantee Buying has never been so simple! The only thing you need to do is place an order and pay for it. If you choose the gold payment, just leave the gold for your order in your inventory. Leave the rest to us.
- 4. 100% Satisfaction Guarantee We offer 24 hours service every day. You can buy all services at any time! Please feel free to contact us by online chat if you have any questions.
- >> About RSBee
- 10/15/25 - OSRS 2025 Halloween Event Guide Happy Halloween, Scapers! The OSRS Halloween holiday event started in the game on 15 October. Now you can log in and complete it, and claim the Halloween rewards. Then, you can sell the rewards for OSRS gold or keep them in your bank. Here is a guide for you. Requirements There are no requirements, and it is available for both members and non-members. Items Runes for Varrock and Lumbridge teleport A few...
- 08/07/25 - OSRS Scrambled! Quest Guide Scrambled! is the latest OSRS quest released along with The Final Dawn and Shadows of Custodia on 23 July 2025. The quest is set at the temple north of Tal Teklan. It's also short and easy to complete. The final puzzle may puzzle you. But no worries, here is a detailed guide below. Quest Requirements You must have completed the Children of the Sun quest to access Varlamore. And also, it requires 38 Construction, 36 Cooking,...
OSRS ToA - Everything You Need to Know About The Wardens
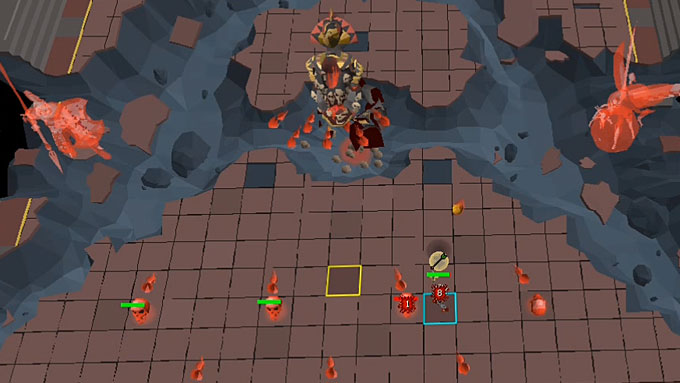
Tumeken's Warden and Elidinis' Warden are the final Bosses of Tombs of Amascut. You need to complete all paths before entering the boss room. And then speak to Osmumten (or Amascut if you haven't completed Into the Tombs, the OSRS miniquest) before the fight can begin.
There are three phases during the battle.
Phase 1 - Destroy the Obelisk
After speaking to Osmumten (or right-click to quick start), the obelisk will begin to charge up the Wardens (the red energy orbs will move to them). Attack the obelisk to destroy it.
We suggest you stand on either side, slowing the recharging of any Warden to prevent them from attacking simultaneously. By doing this, you will take three damage from blocking each orb.
When the Wardens recharge, they will perform one of the following attacks:
Charged Shot - They will launch energy balls (unavoidable) toward you. You will take all the damage if you are soloing. For a team, all members should stand together to disperse the damage if it's a big ball. Spread out to avoid splashing damage onto each other when you see the small ball.
Floating Pyramids - Many floating pyramids will appear on the floor and discharge damaging lights to damage you. You can stand in the center of four pyramids to avoid taking damage and keep attacking the obelisk if the Wardens don't perform this attack simultaneously. Otherwise, run to the edge of the room (next to the Wardens) to evade the attack.
Phase 2 - Defeat one Warden
When you destroy the obelisk, one of the Wardens will move to you with protection prayers activated against two attack styles. Tumeken's Waren will always initially pray against Magic, while Elidinis' will initially pray against Ranged. You will have 100% accuracy during the battle.
Alternately use Ranged and Magic to attack the Warden. Once you deal enough damage (the Warden's yellow bar is full), it will stop attacking you (the attack of the obelisk will also disappear if it happens), and its core will appear on the floor. Attack it to deal damage to the Warden. We suggest you use melee because you can cause maximum damage every time you attack.
When the health of the core decreases to 0, the second phase ends.
During the battle, the Warden will use all three attack styles (a red skull as a magic attack and a normal one as a ranged attack), and the obelisk will also charge and launch attacks.
We suggest you move from its melee range and use the protection prayers of Magic and Ranged to avoid damage.
Special attacks of the Warden
Imprisonment - The Warden will throw a dark-coloured projectile toward you (encasing you in stone) at your last position when the attack occurs, preventing you from moving or attacking. Click to move away when the Warden performs it.
Divine Projectile - The Warden will disable your protection prayer and perform either a red scimitar (melee attack), a white arrow (ranged attack), or a blue spell (magic attack) at you. Activate the protection prayer according to the colour of the attack.
Note: All attacks only damage on impact. It's not too late to activate the protection prayer when the Warden starts to attack you.
Attacks of the Obelisk
When you are fighting with the Warden, the obelisk will be recharging. When the obelisk is glowing, it will discharge and perform some special attacks.
Converging Beam - The obelisk will shoot out two beams toward relative directions (north and south, or west and east) end of the area, one before and one after. And they will spread out and converge towards the middle. You can run to the center first and move to the area where the beam disappears at an appropriate time.
Windmill Beam - The obelisk will shoot out four beams, rotating counterclockwise like a windmill. Move as the beams move to avoid taking damage.
Lightning Skull - The obelisk will throw red skulls and discharge lightning outward in a 7x7 area. You can move away from the landing positions quickly or stand two tiles away from the tile where the skull lands in each cardinal direction (not diagonally) to avoid damage.
The Core
The Warden suffers five times more damage than you do to the core. For example, if you hit a 20, the Warden will take 100 damage.
The special attack of dragon claws and the dragon dagger will deal massive damage to the core, especially with the liquid adrenaline and lightbearer.
Phase 3 - The Final Battle
Once you defeat the Warden in phase 2, the obelisk will grow unstable and explode, and the room becomes warped into a void. Then the final battle begins. We suggest you fight against it with Ranged.
The Warden will start attacking you by raising the floors (the basic attack) from its right first, then left, and on both sides.
Find the middle column of the room (you can mark it with the Ground markers plugin if you use RuneLite) and stand at least one tile left/right from the center opposite where the Warden is facing. Move to the center middle column when
the Warden raises the floors on both sides.
The Warden will stop raising the ground and activate all three protection prayers when its health reaches 80%, 60%, 40%, and 20%. Then it will launch Energy Siphons (red skulls) onto the floor. Switch your melee weapon (you can only attack it with) and destroy them as soon as possible to damage the Warden. Otherwise, you will take the damage.
The phantoms of the bosses from earlier paths will appear to help it when the Warden's health reaches 60% and 40%. Akkha's and Kephri's for Elidinis' Warden, and Zebak's and Ba-Ba's Phantom for Tumeken's Warden. It makes the battle more troublesome.
Note: If you activate the Aerial Assault invocation, the fireball from Kephri's will deal more damage and have a 3x3 area of effect instead.
When the Warden's health reaches under 5%, it will regain 20% of its max health and become enraged. It will no longer raise the floors but begin to emit unstable energy bolts randomly across all walkable tiles. The dark phantom behind the Warden will tear the tiles, limiting the space you can move around up to the first row next to the Warden. Defeat it as soon as possible. Otherwise, the battle will be difficult.
Note
You can save some Ambrosias for fully restores in the final battle.
The Blessed crystal scarabs and Smelling salts are helpful during the fight.
The special effect of the ruby bolts(e) with a crossbow may work well.
The Wardens' Invocations
There are six invocations to make it more challenging to fight with the Wardens. And the invocations will increase your raid level.
Ancient Haste (+10 raid level) - The Wardens will charge faster during the first phase.
Acceleration (+10 raid level) - The Wardens will attack faster, and the obelisk charges faster during the second phase.
Penetration (+10 raid level) - The obelisk will deal more damage to successful attacks and also temporarily disable overhead prayers.
Overclocked (+10 raid level) - The slam attack is 1 tick faster in the final battle.
Overclocked 2 (+10 raid level) - The slam attack is 2 ticks faster in the final battle. You must activate Overclocked.
Insanity (+50 raid level) - The slam attack is 3 ticks faster in the final battle. There is less time to disable the Energy Siphons. The slam attack resumes based on where the Warden left off. Red lightning strikes faster. The dark phantom will move each row of floor tiles faster. You must activate Overclocked 2.
That's all for today. Thank you for reading.
The RSBee Team